|
Introduction
The WebControl System
allows you to control your web site from any Internet browser.
This virtually eliminates the need for novice users to learn and
use FTP and SSH. The more familiar interface of the web browser
combined with point and click simplicity, makes the WebControl
System an extremely user-friendly web management tool. The
WebControl System is included with every account.
top of
section
Login
Information
To log into your
WebControl System, go to www.yourdomain.com/cgi-bin/plusmail
You will need to use your
username and password. Enter this information into the boxes,
and click "Login". You will then see the main page of
the System.
Site
Summary
Clicking on the Site
Summary button shows you valuable information about your
account. Inside you will find:

Site Name:
This is the name of your web site, and is the same as your
registered domain name.
Site
Administrator Username: You will need a user name to
access or "connect" to our computers. Just like your
site name, your user name will be unique from everyone else on
the server.
Disk Used:
This is how much disk space you have used.
Server Names:
Each web site is set-up on a specific server. This section tells
you the name of the server your site is on. Web: tells you the
name used to reach your site through a browser window. Secure:
tells you what server name to use when calling the secure server
(a secure form, for example)
top
of section | tutorial
index
Site
Reports
Site Reports give you
valuable information about accesses and errors to your web site.
You will be able to see who has visited your site and statistics
regarding the number of hits to certain pages, and by certain
individuals.

Web Server:
This will show you Wusage, a graphical statistics program. Click
this link to see how many people access your site, and which
pages they visited. If your account has the referrer logs
option, you will be able to see exactly how your visitors
reached your site (through a link on a search engine, for
example).
Raw Access Logs:
Access logs show you in text format where accesses to your page
are coming from. Each line will show what IP address the visitor
was using while accessing your web site, at what time they came,
and to what page.
Error Logs:
Error logs show you the time and date that someone experienced
an error page. If you have error logs enabled, you can access
them through your home directory. (See the "Site
Manager" section to learn how to access your home
directory.)
top
of section | tutorial
index
User
Manager
A user is someone who can
use or access your site files. As the web site owner, you decide
who has permission to access your account. First, you need to
add users. To do so, click on the Add User link.
There are three levels of
permission; POP, FTP and SSH.
FTP
(File Transfer Protocol): FTP is a method of uploading files
from your computer to the server your account is located on, or
downloading files from the server to your local computer.
To upload or download
files using FPT, you must use an FTP client such as the Site
Manager in the WebControl Panel, or WS_FTP. You will find
instructions on how to use Site Manager here. For WS_FTP
instructions, click here.
To set-up an FTP
account:
1. Follow the steps
listed under General Account Set-up instructions.
2. Select "FTP" as the account type in Step 3.
3. If you need to limit the user to a particular directory,
enter the directory in Step 6. If not, leave it blank
SSH (Secure
Shell): SSH is secure Telnet. Telnet is a protocol that
enables you to log into a remote host or terminal through your
home pc, as though you were sitting directly at the server your
account is on.
To set-up an SSH
account:
1. Follow the steps
listed under General Account Set-up instructions.
2. Select "Telnet" as the account type in Step 3.
3. If you need to limit the user to a particular directory,
enter the directory in Step 6. If not, leave it blank.
POP (Post Office
Protocol): This is an email account, a private storage
location for anyone sending electronic mail. It can be accessed
from any computer running a third party email program such as
Eudora, Netscape or Outlook. It is sometimes confusing to think
of email as a level of permission, but you are still letting
someone access a small piece of your account.

General user
account set-up instructions:
1. Click on "Add
User" at the top of the screen.
2. Select the account type you wish to add (POP, FTP, SSH) Look
at description of each above, to determine which is best for
you.
3. For Username, put the name you wish your user to access the
account with.
4. Enter the password that users will use to access the account.
5. The directory field is used to limit a user to a particular
subdirectory (so they cannot write files in directories outside
the one specified). The restricted user will still be able to
read directories outside the restricted one. However, they will
not be able to write or execute to the directory.
This will be relative to
the /www directory, such as the following example:
Directory: /www/users/bob
Entry in directory field will be: /users/bob
6. If you are setting up
an email account, leave the directory field blank.
7. Click "Setup".
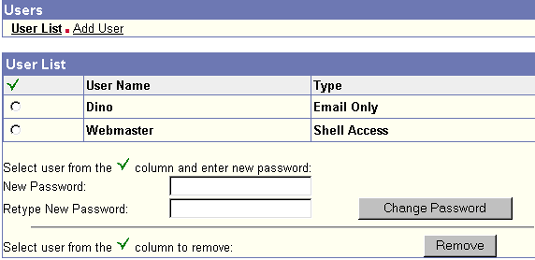
By clicking on user list,
you can easily see who you have added to your account, and what
kind of permission they have. You can check off the username you
wish to modify from the left hand side, and then delete or
modify the password for it below.
This user list shows that
Dino is just an email account, while Webmaster has full SSH
access. You can remove and add users through this interface.
There may be charges for
setting up additional users under your account. If you are
unsure whether you may add an additional user account, please
contact the sales department
top
of section | tutorial
index
Site
Manager
The Site Manager will be
a very important tool in the creation of your web site. After
all of your hard work, you will need to upload the web site to
your server space on our computers. The Site Manager is where
you will begin.

It is very important that you name your home page, the first
page that you want visitors to see when they visit your web
site, to index.htm or index.html. When a browser visits your web
site by typing in your domain name, i.e., www.yourdomain.com,
the browser program will automatically search for a page titled
index.htm or index.html by default. If the browser does not find
one, your visitor will not be able to get into your web site
without a specific page name to add to the domain URL. Once you
name your first "home" page index.html, you will need
to upload it to the www directory in your account.
To Upload to www
1. Check off the yellow folder titled "www" and click
on the link to open it. In this folder, you will see files that
have been installed to your account.
2. Click on "Browse" in the File Upload section. Find
the index.html you created for your home page. Save as
index.html and press upload. This will transfer this file from
your computer to ours.
3. You should see the index.html file in the "www"
folder above.
4. Once it is uploaded, you can edit, rename, or delete each
file you create.
5. Open up your web browser and type in your domain name. You
should see the page you created in your browser.
6. Through this web interface, you can click on the appropriate
buttons to move, delete, and modify files that you have created.
As your web knowledge increases, you may create more folders for
better organization. The left side of the screen controls the
directories and subdirectories of your account. The right side
controls the individual files.
Password
Protecting A Directory
Sometimes part of a web
site will need to be password protected so that only certain
users can access it. You can create password protection that
will block access to all users except those with passwords that
you create. It is generally not a good idea to password protect
your "www" directory, because no one will be able to
access your web site.
To password
protect a directory:
1. Once you have created
a directory you want to protect, select that folder in the Site
Manager. If the directory is inside another one in the /www
directory (i.e., /www/images/secret), select the directory it is
located in and click "Open Directory". If you would
like to protect a file, click on the file name inside the
folder.
2. Select the username and password used to enter the directory.
You can create several different username/password combinations
for the same directory if you wish.
3. Click "Protect".
4. To test it, type in the path name that you have protected
(ex. http://yourdomain.com/protect/protected.html) to see if a
password window is displayed.
top
of section | tutorial
index
E-Mail
Forwarding
Email forwarding (also
called email redirection) is used to redirect email from one
address to another. For example, you might have sales@yourdomain.com
automatically redirected to your sales person's personal email
address, and support@yourdomain.com redirected to your support
person's personal email address.
You may also have
redirects set-up to send email to more than one address. For
example, you may have email addressed to support@yourdomain.com
redirected to each member of your support staff. You may have as
many redirects as you like, and with your WebControl System,
setting them up is as simple as filling in the blanks. Once
you've logged into your WebControl System, select the Email
Forwarding button.
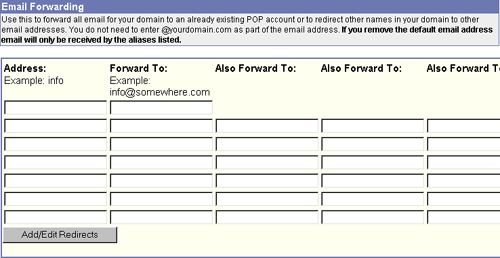
To set-up an email redirect:
1. Address: Enter the
name or title portion of the address only. For example, you
would enter sales and not sales@yourdomain.com.
2. Forward To: Enter the FULL valid email address that you want
the email forwarded to. For example, joe@elsewhere.com (Type
carefully. If you make an error the email will be forwarded to
an incorrect email address).
3. Also Forward To: If applicable, enter the FULL valid email
address of others you want this email to go to. For example,
jack@overthere.com.
4. Add/Edit Redirects: Click this button to save your changes.
To edit or delete an
existing redirect, simply change or remove the information in
the entry fields and click on Add/Edit Redirects.
Please note:
Deleting the default entry will remove the email aliasing
feature, and you will not receive email from misspelled or
incorrect email addresses.
top
of section | tutorial
index
Creating
a Mailing List, Subscribable Mailing List & Majordomo List
Mailing lists are a
popular way for people to send and receive information of a
particular type. For example, you might wish to add all of your
customers to a mailing list, then notify them all of upcoming
sales or specials with just one email flyer.
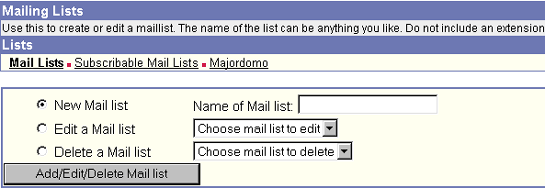
To create a new
mailing list:
1. Check off "New
Mail list".
2. Enter the name you wish the list to be under in the
"Name of Mail list" box. For example, if you wanted
the list to be newsletter@yourdomain.com, you would enter
newsletter into the box.
3. Click "Add/Edit/Delete Mail list".
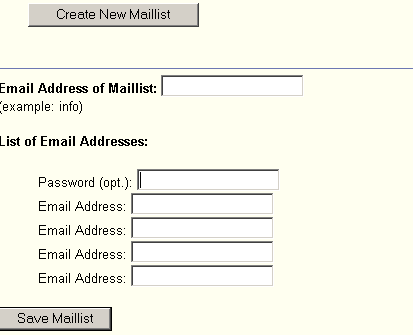
4. A page with entry boxes for email addresses will now be
displayed. When you are finished adding addresses to your list
be sure to click on the "Add to List" button to add
your entries to your new list. If you run out of spaces, save
your changes and then edit the list (see below) and more boxes
will be added to the form.
To edit a mailing
list:
1. Check off "Edit a Mail list".
2. Choose the list you wish to edit from the pull down menu.
3. Click "Add/Edit/Delete Mail list".
4. A page with entry boxes for email addresses will now be
displayed. When you are finished adding addresses to your list
be sure to click on the "Add to List" button to add
your entries to your new list. If you run out of spaces, save
your changes and then edit the list again and more boxes will be
added to the form.
To delete a
mailing list:
1. Check off "Delete a Mail list".
2. Choose the list you wish to delete from the pull down menu.
3. Click "Add/Edit/Delete Mail list".
Password
protecting a mail list.
If you would like to password protect your mail list, please
follow these
steps when sending the list.
1.) Type the password on the very top line of the body of your
message
2.) Hit enter once
3.) Begin typing your message
Please note: This feature does not work with Outlook Express.
If you use Outlook Express, you may want to use a Hotmail or
Yahoo address
when sending to the list.
Subscribable
Mailing Lists
Making a mailing list subscribable allows your customers to
subscribe to your mailing list simply by emailing a certain
address.
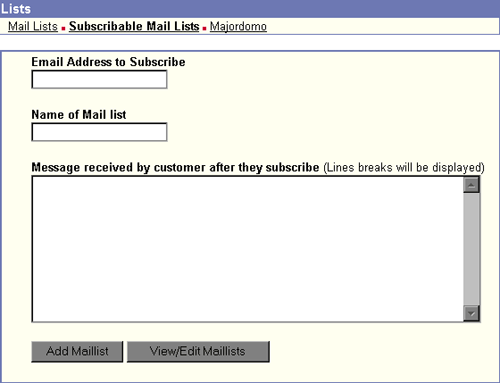
To add a
subscribable mailing list:
1. Enter the address where your customers will send email to
subscribe to the list.
2. Enter the mailing list name (i.e., newsletter@yourdomain.com).
3. Enter a short message that will be sent to your customers
once they are subscribed to the list.
Majordomo
Majordomo is a subscribable mailing list with administrative
features. It has more comprehensive features than regular
subscribable mailing lists. Please note that additional charges
may apply for this feature.
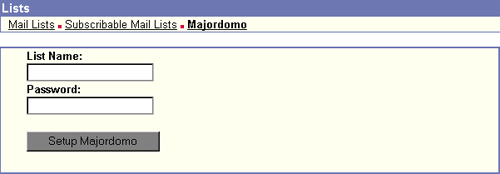
To set-up a
majordomo list:
1. Enter the desired list name.
2. Enter the password you wish to use for the list.
3. Click "Setup Majordomo". Majordomo usually requires
36-48 hours to be activated.
top
of section | tutorial
index
Autoresponders
An autoresponder is a
pre-determined message with information you want automatically
sent to anyone who emails a designated email address/mailbox at
your domain. When an email is sent to a mailbox that you have
assigned an autorespond message to, the autoresponder
automatically sends a reply. You can easily create an
autoresponder with the WebControl System provided with your
domain.
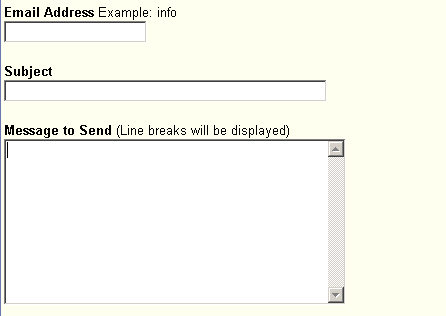
To set-up an
autoresponder:
1. Put the email address you would like to have an autoresponder
come from in the "Email Address" field.
2. Create the message you would like people to receive when they
email you.
3. Click "Add Autoresponder". You can always edit,
view, or delete them later.
4. Send an email to that address to make sure it works!
top
of section | tutorial
index
Extra's
There are several
features available for accounts that may require an additional
charge. If you are not sure whether a particular feature listed
in "Extras" is included with your account, please
contact the Sales Department. To install a specific feature,
check off the correct one and click on "install
service". After 10 minutes, follow the individual links
below.
Referrer Logs:
If Referrer Logs are included with your account, they just need
to be installed. Check off the Referrer Logs option. Please see
the Site Reports page for usage, and to view these statistics.
Error Logs:
If Error Logs are included with your account, they just need to
be installed. Check off the Error Logs option. These are
installed automatically. Please see the Site Reports page for
usage.
Real Audio/Video:
This is installed automatically. Please see the Real Audio/Video
section for instructions on uploading Real media files in the
correct format.
Chat:
1. Name the chat file, i.e., music.html.
2. The location of the chat file is relative to your www
directory. For example, if you wanted the URL to be http://yourdomain.com/chat/music.html,
you would put /chat in the next field. Make sure to put the
"/".
3. Java chat can be English only; Volano can be a language other
than English.
top
of section | tutorial
index
WebControl
Password
To password protect your
WebControl System, click on "Password Manager".
Click on the specific
username, and type the password you wish to change to. You must
then retype the password for confirmation.
Free
Scripts:
There are numerous free
scripts included with most accounts. Since these features
require disk space, they are not installed by default. However,
we have made installation of these features very easy. Simply
check off the features you wish to add to your account, and
click Install Scripts. Then, follow the individual instructions
for each script.
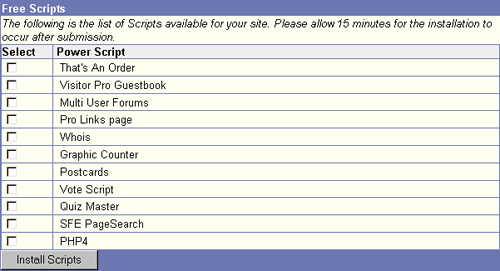
Script Setup URLs
Once you install a script from the list
above, you will need to configure it for your web site. Below
are the URLs at which you will find the set-up functions. Please
note that in each one, you will need to replace yourdomain.com
with your personal domain name.
That's An Order: http://yourdomain.com/lto.htm
(click
here for additional instructions)
Visitor Pro Guestbook: http://yourdomain.com/vbpro/docs
(click
here for additional instructions)
Multi User Forums:
http://yourdomain.com/forums/cgi-s/
(click
here for additional instructions)
Pro Links Page: http://yourdomain.com/links/manual.htm
(additional instructions coming soon)
Whois: http://yourdomain.com/cgi-bin/whois.cgi
(click
here for additional instructions)
Graphic Counter: http://yourdomain.com/counter/
(click
here for additional instructions)
Postcards: http://yourdomain.com/cards
(click
here for additional instructions)
Vote Script: http://yourdomain.com/pollit
Quiz Master: http://yourdomain.com/quiz
(click
here for additional instructions)
SFE Page Search: http://yourdomain.com/search/instruct.htm
PHP4: This script does not need to be
set-up once it is installed.
(click here for
additional instructions)
top
of section | tutorial
index
|